Wednesday 12 December 2012

Flash CS: Simple iOS App - Deploying to a device


Submit Flash Apps to Appstore:

http://www.youtube.com/watch?v=wz4kHk3Aaas

Tuesday 11 December 2012

iCloud Display Sets


What's the use of iCloud Display Sets?


When adding iCloud support to iOS app one can configure iCloud Display Set and link it with an app by specifying NSUbiquitousDisplaySet. But iCloud works even without it, so my question is: what's the purpose of iCloud Display Sets at all?
Couldn't find any clear answer anywhere in the docs. And what's more, based on the Apple docs it seems as if specifying Display Set for your app was mandatory if you use iCloud. That did confuse me a bit.
It is so that one might want to share the same Display Set for multiple applications or for iOS and Mac app versions?


NSUbiquitousDisplaySet (String - iOS, Mac OS X) contains the identifier string that you configured in iTunesConnect for managing your application’s storage. The assigned display set determines from which mobile data folder (in the user’s mobile account) the application retrieves its data files.
If you create multiple applications, you can use the same display set for your applications or assign different display sets to each. For example, if you create a lite version of your application, in addition to a full-featured version, you might use the same display set for both versions because they create and use the same basic data files. Each application should recognize the file types stored in its mobile data folder and be able to open them.


http://www.scribd.com/doc/72156702/84/Creating-iCloud-Display-Sets


Monday 10 December 2012

Corona SDK Language using LUA for All Devices


Corona is the leading mobile app development framework.

From games to eBooks to business apps, Corona is unmatched in giving mobile app developers the ability to develop high quality content at record speeds. Corona SDK is only the start; our vibrant community, educational resources, and complementary development tools, make Corona the top choice among mobile app developers.
Read on to learn why Corona is the best solution for building high-quality mobile apps.


Corona SDK  Language using 'LUA'  for All Devices

http://www.coronalabs.com/products/corona-sdk/

IDE:

LUA  Glider or many more


Introduction:
http://mobile.tutsplus.com/tutorials/corona/introduction-to-corona-sdk-easy-cross-platform-development/


Learning Corona:
http://learningcorona.com/

Build for AppStore:
http://developer.coronalabs.com/forum/2011/03/13/build-app-store
http://www.coronalabs.com/blog/2011/05/02/tutorial-apple-validation-with-corona-sdk/
 

How to Publish App to the Android Market


http://mobile.tutsplus.com/tutorials/android/publish-to-android-market/

http://apcmag.com/how-to-take-your-app-to-market.htm


http://www.youtube.com/watch?v=gpxM0ffAvok
http://www.youtube.com/watch?v=ou8yJvI8HCE

Sunday 9 December 2012

libCordova.a cordova issue

clang: error: no such file or directory: '/Users/admin/Library/Developer/Xcode/DerivedData/_TESTING_-fzbkvdbnndieeagphtjhdndiyttl/Build/Products/Debug-iphoneos/libCordova.a'


For your project, set the build setting "Build Active Architecture Only" to yes.
(Maybe also set the the Architectures build setting to "Standard (armv7, armv7s)" for CordovaLib project.)


Reference:

http://stackoverflow.com/questions/12716830/xcode-4-5-no-such-file-or-directory-libcordova-a

Wednesday 28 November 2012

In App Purchases in iOS


Adding In-App Purchase to your iOS and Mac Applications:

http://developer.apple.com/library/ios/#technotes/tn2259/_index.html


In App Purchases: A Full Walkthrough

http://troybrant.net/blog/2010/01/in-app-purchases-a-full-walkthrough/


Introduction to In-App Purchases (iOS 5):

http://www.raywenderlich.com/2797/introduction-to-in-app-purchases

for iOS 6:

http://www.raywenderlich.com/21081/introduction-to-in-app-purchases-in-ios-6-tutorial


Sunday 25 November 2012

AddressBook iOS 6 issues


Problem:


I am updating an app for iOS 6 Address Book authorization and have hit a problem in testing. The simulator always returns that authorization is granted. This means I do not see the dialog popup requesting permission and can therefore not test that code path. Ok, use a device instead... The problem there is the OS appears to remember my answer so only asks once. Deleting the app does not help. On reinstalling it has retained the permission setting from before, so again no popup.

Solution:

From the device, Settings->General->Reset->Reset Location & Privacy.


http://stackoverflow.com/questions/12602984/abaddressbookgetauthorizationstatus-in-simulator-always-returns-kabauthorization


Problem:

dyld: lazy symbol binding failed: Symbol not found: _ABAddressBookCreateWithOptions
or
dyld: Symbol not found: _ABAddressBookCreateWithOptions


Solution:

this code was failing for me at ABAddressBookGetAuthorizationStatus() in iOS5, but as per yunas' answer below, I checked if (ABAddressBookRequestAccessWithCompletion != nil) before going into the ABAddressBookGetAuthorizationStatus() code, and it was true/false for iOS6/5. I'm sure there'll be a more elegant way to cope with the two versions of iOS, but it's done the trick for now.


 if (ABAddressBookRequestAccessWithCompletion != NULL)   // we're on iOS 6
    {
    ....................  


    }
   
    else    // we're on iOS 5
    {
        return YES;
    }


http://stackoverflow.com/questions/12648244/programmatically-request-access-to-contacts-in-ios-6


Thursday 22 November 2012

Create Indexed UITableView (Section)

http://www.iphonedevcentral.com/indexed-uitableview-tutorial/


Tackling that handy index on the right side of table views is really not that complicated. In fact, it only requires that you implement two methods. In this tutorial, I’m going to take you step-by-step on how to wire it all together.


Indexed Table 2

Wednesday 21 November 2012

UICollectionView In iOS 6


http://www.raywenderlich.com/22324/beginning-uicollectionview-in-ios-6-part-12


When Apple first launched the iPad in 2010, you might have been particularly impressed by the Photos app bundled with the device. It had a unique and stylish way of displaying photos via a multitude of layouts. You could view your photos in a nice grid view:

Or you could view your photo albums at the top level as stacks:

You could even transition between the two layouts with a cool pinch gesture. “Wow, I want that in my app!”, you may have thought.
Well, implementing a grid view and other alternative layouts like this was possible to get working on your own, but also quite tricky! It required a lot of code and was difficult to get working exactly right. Couldn’t there be an easier way?
Good news – now there is in iOS 6! Apple has introduced a new class called UICollectionView that makes adding your own custom layouts and layout transitions (like those in the Photos app) incredibly simple to build.
You’re by no means limited to stacks and grids, because UICollectionView is extremely customizable. You can use it to make circle layouts, cover-flow style layouts, Pulse news style layouts – almost anything you can dream up!
The bottom line is you have an exremely powerful new way to present ordered data to users, and you should start learning about it! It’s just as important (and helpful) of a class as UITableView is. The good news is if you’re familiar with UITableView, you’ll have no problem picking it up – using it is very similar to the table view data source and delegate pattern.
In this tutorial, you’ll get hands-on experience with UICollectionView by creating your own grid-based photo browsing app. By the time you are done this tutorial, you will know the basics of using UICollectionView and will be ready to start using this amazing technology in your apps!

Anatomy of a UICollectionViewController

Let’s go right to an example of one of these babies in action. The UICollectionViewController family contains several key components, as you can see below:

Take a look at these components one-by-one:
  1. UICollectionView – the main view in which the content is displayed, similar to a UITableView. Note that it doesn’t necessarily have to take up the entire space inside the view controller – in the screenshot above, there’s some space above the collection view where the user can search for a term.
  2. UICollectionViewCell – similartoaUITableViewCellinUITableView. Thesecells make up the content of the view and are added as subviews to the UICollectionView. Cells can either be created programmatically, inside Interface Builder, or via a combination of the two methods.
  3. Supplementary Views – if you have extra information you need to display that shouldn’t be in the cells but still somewhere within the UICollectionView, you should use supplementary views. These are commonly used for headers or footers of sections.
  4. Decoration View – if you want to add some extra views to enhance the visual appearance of the UICollectionView (but don’t really contain useful data), you should use decoration views. Background images or other visual embellishments are good examples of decoration views.
  5. In addition to the above visual components, UICollectionView also has non-visual components that help with laying out content:
  6. UICollectionViewLayout – UICollectionView does not know anything about how to set up cells on screen. Instead, its UICollectionViewLayout class handles this task. It uses a set of delegate methods to position every single cell in the UICollectionView. Layouts can be swapped out during runtime and the UICollectionView can even automatically animate switching from one layout to another!
  7. UICollectionViewFlowLayout – You can subclass UICollectionViewLayout to create your own custom layouts (as you’ll learn about in the next tutorial), but Apple has graciously provided developers with a basic “flow-based” layout called UICollectionViewLayout. It lays elements out one after another based on their size, quite like a grid view. You can use this layout class out of the box, or subclass it to get some interesting behavior and visual effects.
You will learn more about these elements in-depth throughout this tutorial and the next. But for now, it’s time for you to get your hands into the mix with a project!

Automated Testing With Xcode


http://www.raywenderlich.com/22324/beginning-uicollectionview-in-ios-6-part-12

Passbook in iOS 6


http://www.raywenderlich.com/20734/beginning-passbook-part-1

http://www.raywenderlich.com/20734/beginning-passbook-part-1


The passes implementation in iOS 6 is the hottest technology coming out from Apple right now, and it’s groundbreaking for more reasons than one might imagine.
Passes are the result of some awesome fusion. Four separate technologies all combine together to deliver a completely new experience to iPhone users:
  1. The new iOS framework PassKit
  2. The new Passbook app bundled with iOS
  3. Apple’s push notification service (this time delivery is guaranteed)
  4. Your own server code!
Passes are very different from any other Apple technology you’ve used before. What makes them unique is that passes are a concept wrapped around a file format. It’s up to you to create a pass file, deliver and present it to the user in any way you like. And the choice of technology and programming language to do that is also up to you!
It hardly needs to be said that with this setup, you have much more control over how you implement things than you normally do with Apple technology.
Since Apple does not handle the mechanisms behind passes, you need to employ a bunch of different technologies to make them work. In this tutorial, you’ll use Objective-C and iOS; use JSON; send multi-part emails with attachments; use OpenSSL to digitally sign files; and more.
The tutorial is divided into two parts:
  1. First, you’ll learn how to create a pass by hand. You’ll start with an empty file and finish with a completely styled and digitally-signed pass.
  2. In the second part, you’ll develop a small iOS app in order to preview passes in the iPhone Simulator or on your device. You’ll also learn about different kinds of passes, thus becoming a Pass Pro.
The trip through this chapter will be wild, but also very rewarding – by the end of it, you’ll have mastered the very latest in Apple technology!

Auto Layout in iOS 6


http://www.raywenderlich.com/20881/beginning-auto-layout-part-1-of-2

http://www.raywenderlich.com/20897/beginning-auto-layout-part-2-of-2


Tuesday 20 November 2012

UIDeviceID (uniqueIdentifier) DEPRECATED Ulternative

In iOS 5 – method UIDevice currentDevice uniqueIdentifier as __OSX_AVAILABLE_BUT_DEPRECATED.

So i have found another solution

Try https://github.com/hiren443/UIDevice-with-UniqueIdentifier-for-iOS-5. It provides two methods, one which is a global UDID that uses the MAC address of the device, and hashes it. The other is an app specific id which uses the MAC address + bundle identifier of the app to generate a hashed UID for the app. I have tried both and they work like a charm. Try-
[[UIDevice currentDevice] uniqueGlobalDeviceIdentifier] //for the global identifier
OR
[[UIDevice currentDevice] uniqueDeviceIdentifier]

AFNetworking alternative fro ASIHTTPRequest for iOS 5 or above


https://github.com/AFNetworking/AFNetworking


http://stackoverflow.com/questions/7623275/afnetworking-post-request


Programmatically Request Access to Contacts in iOS 6


Reference: http://stackoverflow.com/questions/12570774/cant-access-contacts-sources-on-device-in-ios-6


+ (BOOL)contactsServicesEnabled
{
   
   
    if (ABAddressBookGetAuthorizationStatus() == kABAuthorizationStatusNotDetermined) {
        return YES;
    }
    else if (ABAddressBookGetAuthorizationStatus() == kABAuthorizationStatusAuthorized) {
        return YES;
    }
    else {
        return NO;
    }

}

Monday 19 November 2012

TSAlert View with TextField


Reference:  http://stackoverflow.com/questions/6735968/ios-uitextfield-in-uialertview


The only proper solution I found (ie coding from scratch from a UIView) is here: https://github.com/TomSwift/TSAlertView
This is all it takes:

- (IBAction) importTap
{
    TSAlertView* av = [[[TSAlertView alloc] init] autorelease];
    av.title = @"Enter URL";
    av.message = @"";

    [av addButtonWithTitle: @"Ok"];
    [av addButtonWithTitle: @"Cancel"];


    av.style = TSAlertViewStyleInput;
    av.buttonLayout = TSAlertViewButtonLayoutNormal;
    av.delegate = self;

    av.inputTextField.text = @"http://";

    [av show];
}

// after animation
- (void) alertView: (TSAlertView *) alertView 
didDismissWithButtonIndex: (NSInteger) buttonIndex
{
    // cancel
    if( buttonIndex == 1 )
        return;

    LOG( @"Got: %@", alertView.inputTextField.text );
}


enter image description here

Saturday 17 November 2012

Sunday 14 October 2012

Default (Launch) Image Sizes for iPhone & iPad


Default (Launch) Image Sizes for iPhone & iPad 


Apple iPhone/iPad UI Interface GuideLines: (Important)

https://developer.apple.com/library/ios/documentation/UserExperience/Conceptual/MobileHIG/index.html#//apple_ref/doc/uid/TP40006556


Other Help full Links:

http://ivomynttinen.com/blog/the-ios-7-design-cheat-sheet/

http://www.idev101.com/code/User_Interface/sizes.html

http://www.idev101.com/code/User_Interface/launchImages.html


  http://www.idev101.com/code/User_Interface/launchImages.html


The launch image (or default image) is displayed while your app launches. (If no default image is provided, then a black screen is displayed.)
To include a launch image in your app images of the appropriate size for the device, and name them as follows:
Screen sizes (in pixels) of the iPhone 4S and iPhone 5
                        iPhone 4S
3.5" display
iPhone 5
4" display
Non-retina
320 x 480 pixels         
Default.png
N/A
Retina 640 x 960 pixels
Default@2x.png


640 x 1136 pixels
Default-568h@2x.png


Note that the Default-568h@2x.png image is required for an app to display in full-screen mode on the iPhone 5.
Launch images for the iPhone are only accepted in portrait mode. If you want to provide a landscape launch image, create the image and rotate it 90 degrees in an image editor, then save as named above.


Screen sizes (in pixels) iPad
                    iPad - Portrait            iPad - Landscape
Non-retin 768 x 1004 pixels
Default-Portrait.png
 1024 x 748 pixels
Default-Landscape.png
Retina 1536 x 2008 pixels
Default-Portrait@2x.png

2048 x 1496 pixels
Default-Landscape@2x.png


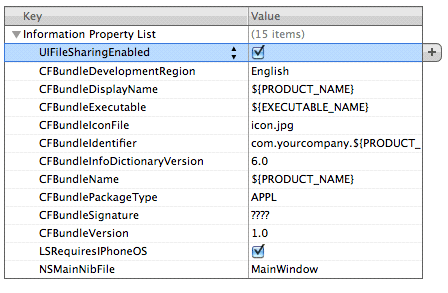
iPad launch images do not include the status bar area. You can provide different launch images for each orientation (Portrait, PortraitUpsideDown, LandscapeLeft, and LandscapeRight); consult the Apple documentation for details.


 Additional References


Monday 10 September 2012

UIPopover on iPhone


UIPopover on iPhone:

http://www.youtube.com/watch?v=1iykxemuxbk

http://www.cocoacontrols.com/controls/wepopover


Core Data on iOS 5 Tutorial


Good Tutorial:

http://www.raywenderlich.com/934/core-data-on-ios-5-tutorial-getting-started


Wednesday 29 August 2012

Tuesday 28 August 2012

Open Source C# (Mono Compatible) Library for Sending Push Notifications To iOS Apps


http://maniacdev.com/2012/08/open-source-c-mono-compatible-library-for-sending-push-notifications-to-ios-apps/


Here’s a C# library (Mono Compatible) that allows you to send push notifications to iOS apps along with Android, Windows Phone, and some support for Blackberry applications.
Here’s a list of features from the readme:
- Supports sending push notifications for many platforms:
- Apple (APNS – iOS – iPhone, iPad)
– Android (GCM/C2DM – Phone/Tablets)
– Windows Phone 7 / 7.5 (and 8 presumably when it’s released)
– Blackberry (Not fully functional)
- Fluent API for constructing Notifications for each platform
– Auto Scaling of notification channels (more workers/connections are added as demand increases, and scaled down as it decreases)
– Asynchronous code where possible, use of library is very event oriented
– 100% managed code awesomeness for Mono compatibility!
You can find the library PushSharp on Github here.
You can find a tutorial illustrating how to use PushSharp with iOS applications in the Wiki here.

Tuesday 31 July 2012

Import and Export Documents in Our iOS Application


Importing & Exporting Documents in iOS


One of the common tasks that an iOS developer has to do is to import or export documents from his iOS application. For example, suppose you are developing a document reader and you want to allow the user to import documents into your application so that it can be read offline. Also, your reader might also support the exporting of documents so that other applications can make use of the document.
In this article, I will walk you through the different techniques you can employ to allow documents to be imported or exported from your iOS application.

Creating the Project

As usual, I will be using an example to illustrate the various techniques discussed in this article. Using Xcode, create a new View-based Application (iPhone) project and name it OfflineReader.
Double-click on the OfflineReaderViewController.xib to open it in Interface Builder and populate it with the following views (see Figure 1):
  • WebView
Round Rect Button

Figure 1. Populating the View window
In the Attributes Inspector window for the WebView, ensure that you check the “Scales Page to Fit” item.
In the OfflineReaderViewController.xib file, add in the following statements in bold:
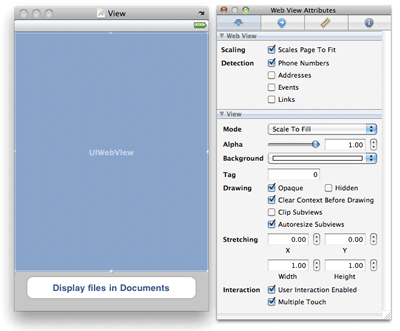
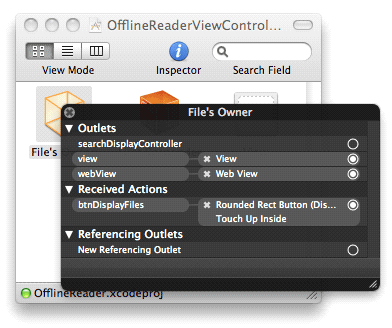
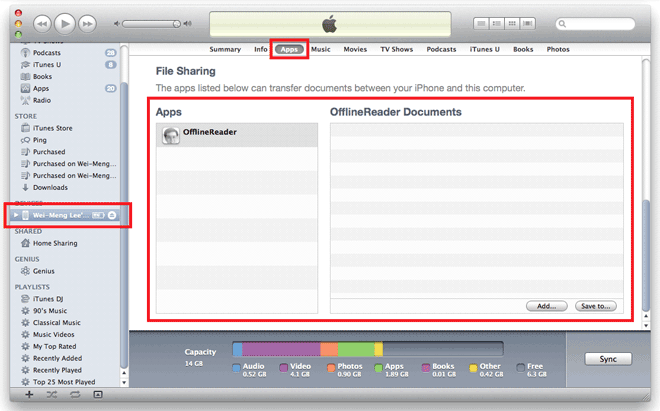
#import <UIKit/UIKit.h>
 
@interface OfflineReaderViewController : UIViewController 
    <UIDocumentInteractionControllerDelegate> {
    IBOutlet UIWebView *webView;
}
 
-(void)openDocumentIn;
-(void)handleDocumentOpenURL:(NSURL *)url;
-(void)displayAlert:(NSString *) str;
-(void)loadFileFromDocumentsFolder:(NSString *) filename;
-(void)listFilesFromDocumentsFolder;
 
- (IBAction) btnDisplayFiles;
 
@end
Back in Interface Builder, connect the outlet and action to the WebView and Button views. Right-clicking on the File’s Owner in the OfflineReaderViewController.xib window should now reveal the connections as shown in Figure 2.

Figure 2. Confirmation the connections of the action and outlet
Drag and drop two files into the Resources folder of the project (see Figure 3). In this example, I have a PDF file named “Courses for Q2 2011.pdf” and an image file named icon.jpg.

Figure 3. Adding two files to the Resources folder of the project
In the OfflineReader-Info.plist file, set the “Icon file” key to “icon.jpg”.
So now you have an iPhone application with the icon set. It also has a PDF document in the Resources folder.

Exporting Documents

The first thing you will learn is how to export a document from your application. For example, in the Mail application on your iPhone, when you received a PDF file, you can either tap on the icon (see Figure 4) to view the document within the Mail application, or tap and hold onto the icon.

Figure 4. A PDF document in Mail
If you do the latter, an action sheet would be displayed (see Figure 5). You can tap on the “Open in...” button to see a list of applications that your document can be exported to.

Figure 5. Viewing your application in an external application
In my case, it will display the list as shown in Figure 6.

Figure 6. A list of applications able to handle your document
So let’s now modify our application so that we can export the PDF document in the Resources project to an external application.
First, declare a variable of type UIDocumentInteractionController in the OfflineReaderViewController.m file:
#import "OfflineReaderViewController.h"
 
@implementation OfflineReaderViewController
 
UIDocumentInteractionController *documentController;
The UIDocumentInteractionController class provides in-app support for providing user interaction with files in your application. In this example, you will use it to export a document to an external application.
Next, define the following methods:
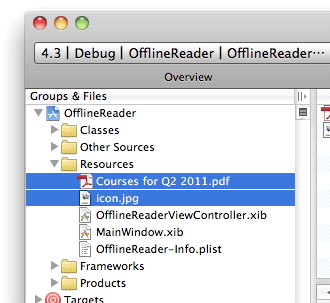
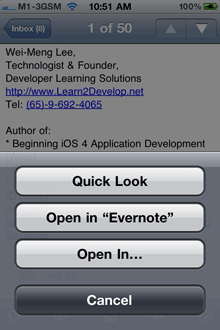
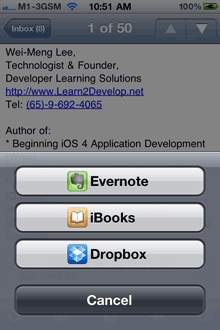
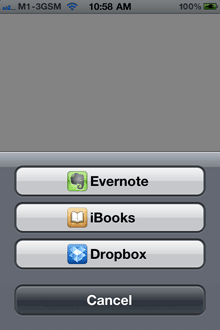
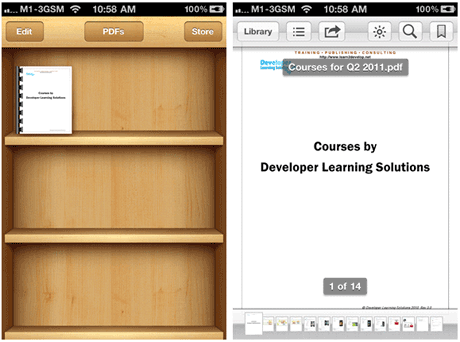
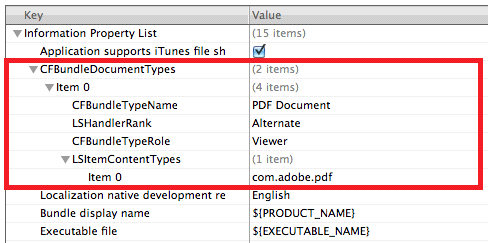
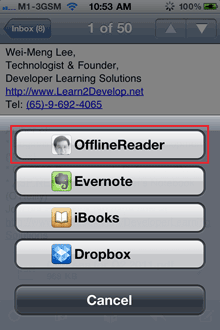
-(void)openDocumentIn {    
    NSString * filePath = 
        [[NSBundle mainBundle] 
        pathForResource:@"Courses for Q2 2011" ofType:@"pdf"];    
    documentController = 
        [UIDocumentInteractionController 
            interactionControllerWithURL:[NSURL fileURLWithPath:filePath]];
    documentController.delegate = self;
    [documentController retain];
    documentController.UTI = @"com.adobe.pdf";
    [documentController presentOpenInMenuFromRect:CGRectZero 
                                                   inView:self.view 
                                                 animated:YES];
}
 
-(void)documentInteractionController:(UIDocumentInteractionController *)controller 
         willBeginSendingToApplication:(NSString *)application {
 
}
 
-(void)documentInteractionController:(UIDocumentInteractionController *)controller 
             didEndSendingToApplication:(NSString *)application {
 
}
 
-(void)documentInteractionControllerDidDismissOpenInMenu:
(UIDocumentInteractionController *)controller {
 
}
The openDocumentIn method basically creates the path to point to the PDF document (that you want to export) and then uses it to feed into the documentController object. You need to set the UTI (Uniform Type Identifiers) for the documentController object so that it can help the system find the appropriate application to open your document. In this case, it is set to “com.adobe.pdf”, which represents a PDF document. Other common UTIs are "com.apple.quicktime-movie" (QuickTime movies), "public.html" (HTML documents), and "public.jpeg" (JPEG files).
The other three methods are the methods defined in the UIDocumentInteractionControllerDelegate protocol. They are fired when the documentController object is being invoked. For this example, you don’t really need to code anything within these methods.
Finally, in the viewDidLoad method, add the following statement:
- (void)viewDidLoad {
    [super viewDidLoad];
    [self openDocumentIn];
}
Press Command-R to test the application on a real device (the Simulator won't work in this case). When the View window is loaded, you will see an action sheet displaying the list of applications that you can export your document to (see Figure 7).

Figure 7. Exporting our PDF document to an external application
If you select iBooks, the PDF document will appear in iBooks (see Figure 8).

Figure 8. iBooks showing our PDF document

File Sharing

The previous section showed how you can export a document to an external application. What about the other way round – importing a document into your application? In iOS, there are two ways to get files into your application:
  • File Sharing through iTunes
  • Through exchanges between applications (like the one you just saw in the previous section)
Let’s discuss the first method first. The first method presents a very easy and direct way for users to transfer large number of files into or out of an application. In the OfflineReader-Info.plist file, add a new key named UIFileSharingEnabled and check it (see Figure 9).

Figure 9. Adding a new key to enable file sharing for your application
Press Command-R to redeploy the application onto the real device again. Launch iTunes and select the device name, followed by the Apps tab. Figure 10 shows that the OfflineReader application now appears under the File Sharing section.

Figure 10. The application is now listed under the File Sharing section of iTunes
To copy a file into the application, simply drag and drop it into the rectangle labeled OfflineReader Documents. Figure 11 shows that I have copied a PDF document into the application. All documents copied will reside in the Documents folder of your application.

Figure 11. Copying a document into the application
If you want to extract the files from the application and save it locally onto your computer, select the file(s) and click the Save to… button.
Now, to prove that the files are really copied into the Documents folder of your application, add the following code to the OfflineReaderViewController.m file:
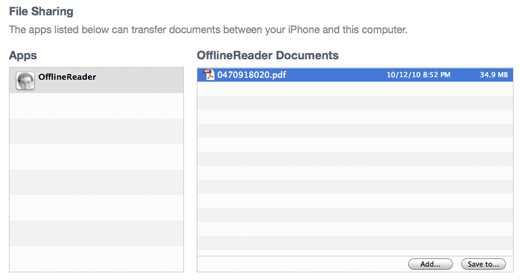
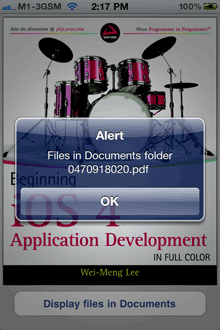
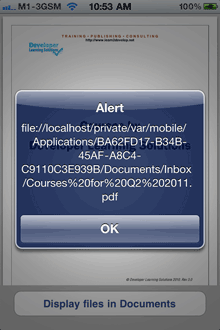
-(void) displayAlert:(NSString *) str {
    UIAlertView *alert = 
        [[UIAlertView alloc] initWithTitle:@"Alert" 
                                   message:str 
                                  delegate:self
                         cancelButtonTitle:@"OK"
                         otherButtonTitles:nil];
    [alert show];
    [alert release];    
}
 
- (void)handleDocumentOpenURL:(NSURL *)url {
    NSURLRequest *requestObj = [NSURLRequest requestWithURL:url];        
    [webView setUserInteractionEnabled:YES];    
    [webView loadRequest:requestObj];
}
 
-(void)loadFileFromDocumentsFolder:(NSString *) filename {
    //---get the path of the Documents folder---   
    NSArray *paths = NSSearchPathForDirectoriesInDomains(  
        NSDocumentDirectory, NSUserDomainMask, YES); 
    NSString *documentsDirectory = [paths objectAtIndex:0];     
    NSString *filePath = [documentsDirectory 
        stringByAppendingPathComponent:filename];    
    NSURL *fileUrl = [NSURL fileURLWithPath:filePath];        
    [self handleDocumentOpenURL:fileUrl];
}
 
-(void)listFilesFromDocumentsFolder {    
    //---get the path of the Documents folder---    
    NSArray *paths = NSSearchPathForDirectoriesInDomains(     
    NSDocumentDirectory, NSUserDomainMask, YES); 
    NSString *documentsDirectory = [paths objectAtIndex:0]; 
 
    NSFileManager *manager = [NSFileManager defaultManager];
    NSArray *fileList =   
        [manager contentsOfDirectoryAtPath:documentsDirectory error:nil];
    NSMutableString *filesStr = 
        [NSMutableString stringWithString:@"Files in Documents folder \n"];
    for (NSString *s in fileList){    
        [filesStr appendFormat:@"%@ \n", s];
    }
    [self displayAlert:filesStr];    
    [self loadFileFromDocumentsFolder:@"0470918020.pdf"];
}
 
- (IBAction) btnDisplayFiles {
    [self listFilesFromDocumentsFolder];    
}
Here, the displayAlert: method is simply a helper method to display an Alert View on the screen. The handleDocumentOpenURL: method takes in a NSURL object and loads the WebView with its content. The loadFileFromDocumentsFolder: method takes in a filename and converts its path into a NSURL object. The listFilesFromDocumentsFolder method displays all the files and folders contained within the Documents folder of the application. Here, I have hardcoded it to display the PDF document named “0470918020.pdf” (which is what I have copied earlier).
Press Command-R to deploy the application on the device again. Tapping the Display files in Documents button will display the filename and at the same time load the PDF document in the WebView (see Figure 12), proving that the file was transferred into the application successfully.

Figure 12. Displaying the files in the Documents folder and loading the PDF document

Importing Documents

The second method to transfer documents into an application is through another application (as seen in the first section of this article). In the beginning of this article, you saw how a PDF document in your application can be transferred to the iBooks application for viewing. This time round, you will learn how a document can be transferred into your own application.
For a start, you shall modify the application to accept PDF documents. What you need to do is to get your application to register with the iOS that it is able to accept PDF document. To do this, you need to modify the OfflineReader-Info.plist file.
Add the new CFBundleDocumentTypes key as shown in Figure 13.

Figure 13. Add a new key to support PDF documents
Note the following:
  • The CFBundleDocumentTypes key is of type Array. It contains an array of dictionaries describing the types of documents supported by your application.
  • Item 0 is of type Dictionary.
  • The CFBundleTypeName key specifies the abstract name for the specified document type.
  • The LSHandlerRank key specifies whether the application is the owner (creator of this file type), Alternate (secondary viewer of this file type), None, or Default.
  • The CFBundleTypeRole key specifies the application’s role with respect to the type - Editor, Viewer, Shell, or None.
  • The LSItemContentTypes key is of type Array. It contains an array of UTIs specifying the file type.
The above entry in the OfflineReader-Info.plist file will register with iOS that the application is capable of handling PDF documents.
When a PDF document is passed into the application, the application will fire a particular method – application:openURL:sourceApplication:annotation:. This method must be implemented in the application delegate.
Hence, add the following in the OfflineReaderAppDelegate.m file:
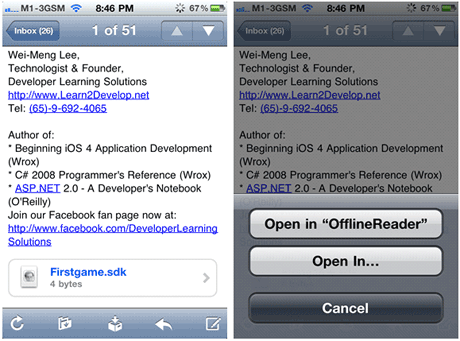
#import "OfflineReaderAppDelegate.h"
#import "OfflineReaderViewController.h"
 
@implementation OfflineReaderAppDelegate
 
@synthesize window;
@synthesize viewController;
 
-(BOOL)application:(UIApplication *)application 
           openURL:(NSURL *)url 
 sourceApplication:(NSString *)sourceApplication 
        annotation:(id)annotation {    
    if (url != nil && [url isFileURL]) {
        [self.viewController handleDocumentOpenURL:url];
    }    
    return YES;
}
When a document is passed into your application, it will be copied into a folder called Inbox, located within the Documents folder. The url argument contains the path to the document in the Inbox folder. In the above, once the document is passed in, you will call the handleDocumentOpenURL: method defined in the OfflineReaderViewController class to load the document in the WebView.
To see the URL of an imported document, add the following statement to the handleDocumentOpenURL: method:
- (void)handleDocumentOpenURL:(NSURL *)url {
    [self displayAlert:[url absoluteString]];
    NSURLRequest *requestObj = [NSURLRequest requestWithURL:url];        
    [webView setUserInteractionEnabled:YES];    
    [webView loadRequest:requestObj];
}
Press Command-R to deploy the application onto the real device again. This time, if you go back to the same email containing the PDF document and tap and hold on to it, you will find that you have the option to open the document in the OfflineReader application (see Figure 14).

Figure 14. Your application is capable of handling PDF document
When the document is opened in OfflineReader, you will see the path of the document as shown in Figure 15.

Figure 15. Confirming the path of the document in the Documents/Inbox folder
Importing Self-Defined Documents
The previous section showed how to import well-known document types, such as PDF. What happens if you want to import your own self-defined document types? For example, you are writing a Sudoku game and wanted to implement your own file format for saving the state of a Sudoku game. In this case, your file might have the .sdk extension, which is only used by your application.
To ensure that your application can handle files with the .sdk extension, you will add the keys as shown in Figure 16 to the OfflineReader-Info.plist file.

Figure 16. Adding new keys to support self-defined document types
Note that you added another key to the CFBundleDocumentTypes array. You set the LSItemContentTypes to a unique value, using the reverse domain name of your company and the type you are defining. Since this is a self-defined content type, you have to define it using the UTExportedTypeDeclarations key.
Note: For more information on UTI, refer to Apple’s documentations – “Introduction to Uniform Type Identifiers Overview”.
Press Command-R to test the application on a real device again. This time round, if your email contains a document of extension .sdk, you will see the icon of your application displayed next to the document name (see Figure 17). When you tap on the document name, you will see a list of options to open your documents with.

Figure 17. Opening a file of type .sdk

Summary

In this article, you have seen the different techniques for handling documents in your application. With this knowledge, you will be able to write cool iOS applications that allows them to interact with the outside world!


 Reference:  http://mobiforge.com/developing/story/importing-exporting-documents-ios

Thursday 12 July 2012

How do I get a thumbnail from UIImagePickerController

The code below will function to take an asset-library URL and then make a UIImage out of the thumbnail representation. Though I use the asset-library url directly there is no reason that this same code couldn't begin by transforming a string representation into a NSURL in order to satisfy the imageURL assignment. Disclaimer: this code probably leaks or something worse, but it answers the original poster's question and is hopefully of value.
The code below is borrowing heavily on this Stack Overflow question that covers basically this same topic. In addition to the code here, I have included AssetsLibrary.framework and the ALAssetsLibrary typedefs referenced in the other question.
The whole trick is that you cannot reference the NSURL from an asset-library directly. I think (though I don't know) that it is somehow referencing a data store instead of a file so the data returned from the URL isn't straight NSData so you cannot use it the old way.
There is a UIImageView in the code that is called photo. Hopefully everything else is easy to figure out.


- (void)imagePickerController:(UIImagePickerController *)picker didFinishPickingMediaWithInfo:(NSDictionary *)info{
    NSURL *imageURL = [info valueForKey:UIImagePickerControllerReferenceURL];
    NSLog(@"%@",imageURL);
    ALAssetsLibraryAssetForURLResultBlock resultblock = ^(ALAsset *myasset)
    {
        CGImageRef iref = [myasset thumbnail];
        if (iref) {
            UIImage *theThumbnail = [UIImage imageWithCGImage:iref];
            [[self photo] setImage:theThumbnail];

        }
    };


    ALAssetsLibraryAccessFailureBlock failureblock  = ^(NSError *myerror)
    {
        NSLog(@"booya, cant get image - %@",[myerror localizedDescription]);
    };

    if(imageURL)
    {
        ALAssetsLibrary* assetslibrary = [[[ALAssetsLibrary alloc] init] autorelease];
        [assetslibrary assetForURL:imageURL 
                       resultBlock:resultblock
                      failureBlock:failureblock];
    }

    [self dismissModalViewControllerAnimated:YES];
}

Tuesday 10 July 2012

Design Images


http://www.freedigitalphotos.net/

http://cooltext.com/Logos

http://www.123rf.com/freeimages.php/

http://office.microsoft.com/en-us/images/results.aspx?qu=business%20finance&ctt=1#ai:MP900401027|mt:2|is:3|

Rich Text Editing in IOS


Rich Text Editing :

Normally people look at creating a Rich Text Editor to be an extremely difficult task as it means having to build it from scratch using the Core Text framework in combination with the UITextInput protocol. Apple provide no standard control for Rich Text Editing, UITextView its self only supports one style, so that’s one font, one color, one justification for the whole document. So where does this leave us? It looks like we only have one option and that’s to use Core Text but there is in fact one other option that has been opened up to us in iOS 5.
This other mysterious option is UIWebView, as of iOS 5 contentEditable can be set to true in a web view, this enables the user to edit all content inside a web page. Today we are going to leverage the power of the DOM to create our own Rich Text Editor.
note: Please be aware this tutorial will only work on iOS 5


http://ios-blog.co.uk/articles/tutorials/rich-text-editing-draggable-images-part-7/

http://ios-blog.co.uk/articles/tutorials/rich-text-editor-inserting-images-part-6/

http://ios-blog.co.uk/articles/tutorials/rich-text-editing-undo-and-redo-part-5/

http://ios-blog.co.uk/articles/tutorials/rich-text-editing-fonts-part-4/

http://ios-blog.co.uk/articles/tutorials/rich-text-editing-highlighting-and-uimenucontroller-part-3/

http://ios-blog.co.uk/articles/tutorials/rich-text-editing-validation-part-2/


http://ios-blog.co.uk/articles/tutorials/rich-text-editing-a-simple-start-part-1/

Wednesday 20 June 2012

ASIHTTPRequest Problem


This issue I had a lot of hard time to figure out why. The problem resides in ASIHTTPRequest itself (iOS), not the rails code.
To make a long story short, the problem is specific to the use of persistent connection for every request sent by ASIHTTPRequest.
While this is good for GET requests, most server implementation does not allow persistent connection to be used with POST request.
I didn't really have time to investigate it deeply on the server side of things but I think that the problem resides with the 100-Continue header that should be sent (and which isn't) with request that has body attached to it (hence PUT/POST). If you want to have a deeper look at what I'm talking about go have a read at the spec sheet: http://www.w3.org/Protocols/rfc2616/rfc2616-sec8.html
So the persistent connection used by ASIHTTPRequest wait for a 100 response to be sent, which is never sent. so it ends up being timed out.
A fix is to set persistentConnection to NO with your post requests like the following:

ASIHTTPRequest *req                     = [ASIHTTPRequest requestWithURL:url];
req.shouldAttemptPersistentConnection   = NO;

Monday 11 June 2012

Date Format Patterns

A date pattern is a string of characters, where specific strings of characters are replaced with date and time data from a calendar when formatting or used to generate data for a calendar when parsing. The following are the characters used in patterns to show the appropriate formats for a given locale.

http://unicode.org/reports/tr35/tr35-6.html#Date_Format_Patterns

Thursday 7 June 2012

Get Data From User Facebook Wall Post and Twitter Tweets

Get Data From User Facebook Wall Posts and Twitter Tweets

Twitter:
https://dev.twitter.com/docs/api/1/get/statuses/user_timeline
https://api.twitter.com/1/statuses/user_timeline.json?screen_name=zaintiger
https://api.twitter.com/1/statuses/user_timeline.json?screen_name=ISEE_Events

Facebook
http://stackoverflow.com/questions/6244693/using-app-access-token-in-ios
http://blog.awpny.com/kaiawpny/2011/how-to-facebook-access-token.html

https://graph.facebook.com/oauth/access_token?grant_type=client_credentials&client_id=121128207961282&client_secret=19f13a3ef1b80961f88f7bfd928ab0f3

https://graph.facebook.com/isee.Entertainment.and.Events
/posts?access_token=121128207961282|9QQBCRY8vflHgc11KIcWAbvRPRk

Monday 23 April 2012

Limit number of characters in uitextview

if(range.length > text.length){
    return YES;
}else if([[textView text] length] + text.length > 140){
    return NO;
}
return YES;

Sunday 22 April 2012

Monday 16 April 2012

Email and URL Validation in Objective-C

Use this Code for Email Validation:

- (BOOL) validateEmail: (NSString *) candidate {
    NSString *emailRegex = @"[A-Z0-9a-z._%+-]+@[A-Za-z0-9.-]+\\.[A-Za-z]{2,4}";
    NSPredicate *emailTest = [NSPredicate predicateWithFormat:@"SELF MATCHES %@", emailRegex]; 
    return [emailTest evaluateWithObject:txtEmail.text];
}


Use this Code for URL Validation:


- (BOOL) validateUrl: (NSString *) candidate {
    NSString *urlRegEx =@"(http|https)://((\\w)*|([0-9]*)|([-|_])*)+([\\.|/]((\\w)*|([0-9]*)|([-|_])*))+";
    NSPredicate *urlTest = [NSPredicate predicateWithFormat:@"SELF MATCHES %@", urlRegEx];
    return [urlTest evaluateWithObject:txtUrl.text];
}

Thursday 12 April 2012

Check if NSString is numeric(integer or float)


NSScanner *scan = [NSScanner scannerWithString:@"string"];

if (![scan scanFloat:NULL] || ![scan isAtEnd])
{
   NSlog (@"string exist like 'abbc','12ww','1.5w',' 5 ' etc");
}
else
{
       NSlog (@"only numeric value like '12','12.5','1.5' etc");
}

Flip clock with Core Animation in iOS Apps


Creating an iPad flip-clock with Core Animation

Check this Link:
http://www.voyce.com/index.php/2010/04/10/creating-an-ipad-flip-clock-with-core-animation/


Wednesday 28 March 2012

Add Custom Background imgae in UISearchBar

  Use this Code:

   UIImageView *backgroundView = [[UIImageView alloc] initWithFrame:searchbar.bounds];
    backgroundView.image = [UIImage imageNamed:@"app_bg.png"];
    [searchbar insertSubview:backgroundView atIndex:1]; // at index 1 but not 0
    [backgroundView release];

Add Custom Image in Navigation Bar for Both iOS4 and iOS5

As you know, until iOS 5 came out, we used drawRect override in AppDelegate to customize UINavigationBar.
Now iOS 5 give us some new method for styling (and old doesn’t work).
How to build app that will work on iOS 4 and iOS 5 with stylized UINavigationBar?
You must to do both!
In AppDelegate use this code:

@implementation UINavigationBar (UINavigationBarCategory)
- (void)drawRect:(CGRect)rect {
UIImage *img = [UIImage imageNamed:@"navbar.png"];
[img drawInRect:rect];
}
@end


and in viewDidLoad method for iOS5 (in your view implementation):

if ([self.navigationController.navigationBar respondsToSelector:@selector( setBackgroundImage:forBarMetrics:)]){
[self.navigationController.navigationBar setBackgroundImage:[UIImage imageNamed:@"navbar.png"] forBarMetrics:UIBarMetricsDefault];
}


If you see, here we are asking if navbar will respondToSelector to avoid crash on iOS4!
If you use this for iOS5:

if([[UINavigationBar appearance] respondsToSelector:@selector( setBackgroundImage:forBarMetrics:)]){
[[UINavigationBar appearance] setBackgroundImage:[UIImage imageNamed:@"navbar_bg.png"] forBarMetrics:UIBarMetricsDefault];
}


Your app will not work on iOS4 because can’t found [UINavigationBar appearance].
But, if you want to target only iOS5 this snippet will work for whole app. You can put it just in didFinishLaunchingWithOptions method in AppDelegate:

[[UINavigationBar appearance] setBackgroundImage:[UIImage imageNamed:@"navbar_bg.png"] forBarMetrics:UIBarMetricsDefault];
}


Sunday 25 March 2012

How to Add Local Notification in IPhone App

 UILocalNotification *localNotif;

   //==================== Add Local Notification ===========================
    localNotif = [[UILocalNotification alloc] init];
    localNotif.fireDate = dateStartDate;
    localNotif.timeZone = [NSTimeZone defaultTimeZone];
    localNotif.alertBody = txtName.text;
    localNotif.alertAction = @"View";
    localNotif.soundName = UILocalNotificationDefaultSoundName;
   
    // Specify custom data for the notification
    infoDict = [[NSMutableDictionary alloc] initWithObjectsAndKeys:txtName.text,@"name",nil];
    localNotif.userInfo = infoDict;
   
    [[UIApplication sharedApplication] scheduleLocalNotification:localNotif];
   
    [localNotif release];
   
    //=========================================================


   //============  Delete Previous Notification ==================
       
        UILocalNotification *notificationToCancel=nil;
        for(UILocalNotification *aNotif in [[UIApplication sharedApplication] scheduledLocalNotifications]) {
            if( [[aNotif.userInfo objectForKey:@"name"] isEqualToString:[editTask objectForKey:@"name"]]) {
                notificationToCancel=aNotif;
                break;
            }
        }
        if(notificationToCancel)
            [[UIApplication sharedApplication] cancelLocalNotification:notificationToCancel];
       
        //==================================
       

Thursday 22 March 2012

Calender integration in iPhone App


How to Add, Edit and Delete Event in Calender
and Synchronize with your App


import Event Kit First:

#import <EventKit/EventKit.h>

Add Event in Calender:

  //  Add New Event
    NSDateFormatter *dateFormate = [[NSDateFormatter alloc] init];
    [dateFormate setDateFormat:@"yyyy-MM-dd HH:mm"];
    NSDate *dateStartDate = [dateFormate dateFromString:[btnStartDate titleLabel].text];
    NSDate *dateEndDate = [dateFormate dateFromString:[btnEndDate titleLabel].text];
    NSLog(@"start date %@  end date %@",[dateFormate stringFromDate:dateStartDate],[dateFormate stringFromDate:dateEndDate]);
    [dateFormate release];
    NSError *err;
    EKEventStore *eventStore = [[EKEventStore alloc] init];
    EKEvent *myEvent  = [EKEvent eventWithEventStore:eventStore];
    myEvent.title     = txtName.text;
    myEvent.startDate = dateStartDate;
    myEvent.endDate   = dateEndDate;
    [myEvent setCalendar:[eventStore defaultCalendarForNewEvents]];
    [eventStore saveEvent:myEvent span:EKSpanThisEvent error:&err]; 

Edit Event:

  //========== then Delete Previous Event from Calender ==================
        editTask = Dictionary of your save items
        NSDateFormatter *dateFormateEdit = [[NSDateFormatter alloc] init];
        [dateFormateEdit setDateFormat:@"yyyy-MM-dd HH:mm"];
        NSDate *dateStartDateEdit = [dateFormateEdit dateFromString:[editTask objectForKey:@"start_date"]];
        NSDate *dateEndDateEdit = [dateFormateEdit dateFromString:[editTask objectForKey:@"due_date"]];
        NSLog(@"start date %@  end date %@",[dateFormateEdit stringFromDate:dateStartDateEdit],[dateFormateEdit stringFromDate:dateEndDateEdit]);
        [dateFormateEdit release];
       
        EKEventStore *store = [[EKEventStore alloc] init];
        EKCalendar *defaultCalendar= [store defaultCalendarForNewEvents];
        NSArray *calendarArray = [NSArray arrayWithObject:defaultCalendar];
        NSPredicate *predicate = [store predicateForEventsWithStartDate:dateStartDateEdit endDate:dateEndDateEdit calendars:calendarArray];       
        NSArray *eventList = [store eventsMatchingPredicate:predicate];
        for (EKEvent *event in eventList) {   
            if ([event.title isEqualToString:[editTask objectForKey:@"name"]]) {
                [store removeEvent:event span:EKSpanThisEvent error:nil];
            }
        }
        [store release];
        //=======================================================================

and the Add New Event:

Delete Event:

   //========== Delete also Event from Calender ==================
    NSDateFormatter *dateFormateEdit = [[NSDateFormatter alloc] init];
    [dateFormateEdit setDateFormat:@"yyyy-MM-dd HH:mm"];
    NSDate *dateStartDateEdit = [dateFormateEdit dateFromString:[dicTask objectForKey:@"start_date"]];
    NSDate *dateEndDateEdit = [dateFormateEdit dateFromString:[dicTask objectForKey:@"due_date"]];
    NSLog(@"start date %@  end date %@",[dateFormateEdit stringFromDate:dateStartDateEdit],[dateFormateEdit stringFromDate:dateEndDateEdit]);
    [dateFormateEdit release];
   
    EKEventStore *store = [[EKEventStore alloc] init];
    EKCalendar *defaultCalendar= [store defaultCalendarForNewEvents];
    NSArray *calendarArray = [NSArray arrayWithObject:defaultCalendar];
    NSPredicate *predicate = [store predicateForEventsWithStartDate:dateStartDateEdit endDate:dateEndDateEdit calendars:calendarArray];       
    NSArray *eventList = [store eventsMatchingPredicate:predicate];
    for (EKEvent *event in eventList) {   
        if ([event.title isEqualToString:[dicTask objectForKey:@"name"]]) {
            [store removeEvent:event span:EKSpanThisEvent error:nil];
        }
    }
    [store release];
    //=======================================================================